NestJS Useful Commands
Note: This is kind of a reminder to myself and a way for me to have this knowledge put somewhere else.
Top 5 NestJS Useful Commands
Scaffold a NestJS project
This will create a new project directory, and populate the directory with the initial core Nest files and supporting modules, creating a conventional base structure for your project.
nest new project-name
Generate a module
nest generate module module-name
Generate a service
nest generate service service-name
Generate a controller
nest generate controller controller-name
Generate a new CRUD resource
This will generate all the files above (module, service, and controller) in one go. You can also get the boilerplate code for CRUD operations, DTOs, and entity files.
Note: You can select between REST API, GraphQL, Microservice (non-HTTP), and WebSockets for the transport layer when you use the generate resource command through the CLI.
nest generate resource resource-name
Alias
You can also use the g alias for generate, such as:
nest g controller controller-name
Other useful commands
There’s pretty much a command for everything in NestJS: class, decorator, filter, guard, pipe, and so on.
Generate a class
nest generate class class-name
Generate a decorator
nest generate decorator decorator-name
Generate a filter
nest generate filter filter-name
Generate a guard
nest generate guard guard-name
Generate an interceptor
nest generate interceptor interceptor-name
Generate an interface
nest generate interface interface-name
Generate a library
This command will generate a libs folder (if it doesn’t already exist) and inside the library-name you gave (e.g. date-format), it’ll generate a src folder with the code in it.
nest generate library library-name
This is how it’ll look:
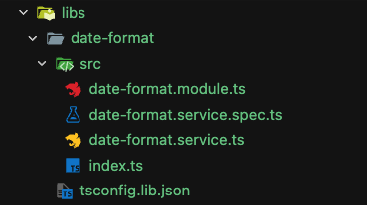
Besides that, this command will also add your lib on the nest-cli.json (which is a topic for another post), on the package.json file, and the jest-e2e.json file. Go check those out! :)
Generate a middleware
nest generate middleware middleware-name
Generate a pipe
nest generate pipe pipe-name
Generate a provider
nest generate provider provider-name
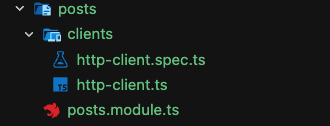
You could also generate a provider inside an existing module:
nest generate provider posts/clients/http-client --flat
This is how it’ll look:
Generate a sub-app
This is useful to generate a new application within a monorepo:
nest generate sub-app mysubapp
This command will add a new application to your project and it’ll completely change the folder structure. So you now have two applications inside the new apps folder and your initial application is still there, but you also have the new application you’ve just generated with this command.
Even if those apps are in separate folders, they can still share common code through libraries (which we’ve covered in this post).
Skip the test file
If you don’t want the CLI to generate the test file for a given command, just use the --no-spec flag option, such as:
nest generate service service-name --no-spec
Generate within an already existing folder
All of the generate commands will create the files in the root folder, so If don’t you want that, you can pass the relative path alongside the name:
nest generate decorator decorators/alphanumeric-transformer
Note: this will create a folder decorators (if it doesn’t exist yet) and a folder alphanumeric-transformer. Therefore, if you don’t want that extra folder, you can use the --flat flag option:
nest generate decorator decorators/alphanumeric-transformer --flat
You can also combine multiple flag options on the same command:
nest generate filter filters/filtertwo --flat --no-spec